What Is a Miniature Garden Called — Types, Names, and How to Start One
The Short Answer — Plus All the Types
Miniature gardening has gotten complicated with all the different names and styles flying around. Fairy garden, terrarium, bonsai garden, dish garden, zen garden, miniature container garden — each one is its own distinct thing with its own aesthetic, skill level, and personality. And honestly, the naming confusion is part of what pulls people into this hobby without them even realizing it’s happening.
As someone who impulse-bought a tiny ceramic mushroom at a craft fair four years ago, I learned everything there is to know about miniature gardening the hard way. Went down a rabbit hole. Never came back up. Zero regrets.
Here’s a quick breakdown of the main types before we go deeper into each one:
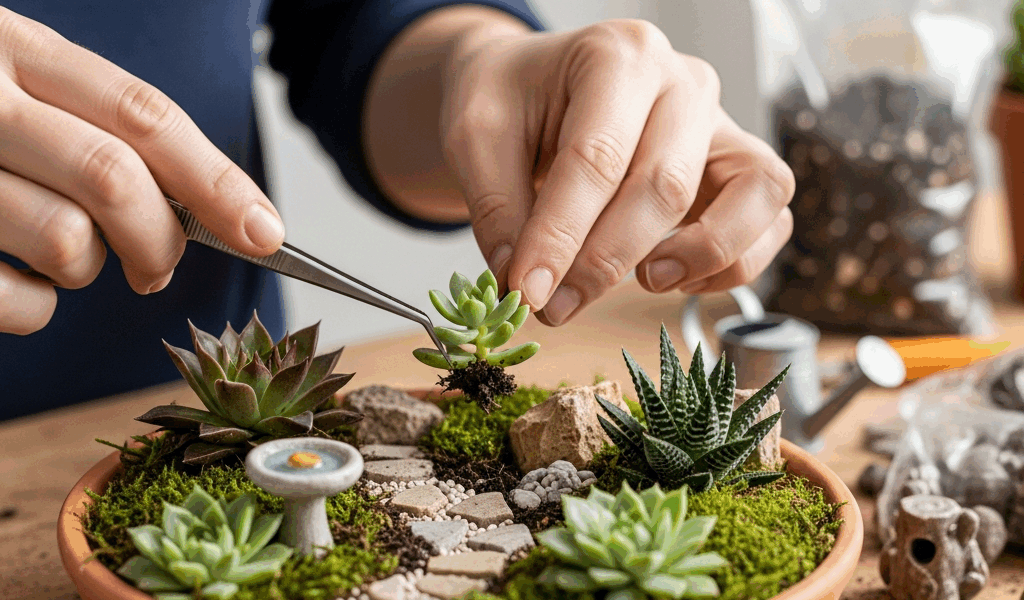
- Fairy garden — A decorative miniature landscape, usually in a container or shallow bed, styled with tiny figurines, pathways, and small plants to create a whimsical scene
- Terrarium — Plants growing inside a glass container, either sealed (closed) or open-top, designed to be a self-contained ecosystem or low-maintenance display
- Bonsai garden — A curated arrangement of one or more bonsai trees, living sculptures shaped and trained over years
- Zen garden — A dry landscape garden, often featuring raked gravel or sand, stones, and minimal plant life — meant as a meditative space
- Dish garden — Multiple plants arranged together in a single shallow dish or tray, prioritizing design and compatibility
- Miniature container garden — A broader catch-all term for any small-scale garden planted in a pot, window box, or container
Each of these deserves its own section. Let’s get into it.
Fairy Gardens — The Most Popular Miniature Garden
But what is a fairy garden? In essence, it’s a tiny imaginary world — usually scaled around 1:12 — built from real plants, decorative accessories, and miniature furniture or figurines. But it’s much more than that. It’s the most searched, most photographed, and honestly most addictive corner of the miniature gardening world. Search “mini gardens” on Pinterest once and you’ll understand immediately.
The aesthetic ranges from whimsical cottagecore to rustic woodland to full beachy vibes. You’re only limited by what miniatures you can find and how far your imagination wanders at 11pm on a Tuesday night — which, in my experience, is very far.
Indoor vs Outdoor Fairy Gardens
Outdoor fairy gardens usually live in a raised bed corner, a planter box, or a tucked-away patio section. Real ground-covering plants — Irish moss, creeping thyme, sedum — stay small and sit perfectly at miniature scale. Indoor versions live in containers. A wide terracotta pot, a wooden crate, an old colander — I’ve seen stunning builds inside a cracked wheelbarrow someone found at a flea market for three dollars. The container matters less than the composition. That’s what makes fairy gardens endearing to us miniature hobbyists.
What You’ll Need and What It Costs
While you won’t need a greenhouse or a landscaping budget, you will need a handful of inexpensive supplies. A solid beginner setup runs between $20 and $50 depending on where you shop:
- A shallow container — a 12-inch terracotta dish works perfectly, around $8–$12 at Home Depot or IKEA
- Potting mix suited to your plants (succulent mix if you want low-maintenance, $6–$9 for a small bag)
- Two to four small plants — creeping thyme, baby tears, or hen-and-chicks are popular choices
- Miniature accessories — Michael’s and Hobby Lobby both carry fairy garden sections; Amazon has bulk accessory packs for around $15–$18
- Small pebbles or gravel for pathways, $3–$5 per bag
Don’t make my mistake. I bought accessories before I bought plants — ended up with a tiny fairy bench that was completely the wrong scale for everything I later picked. Get your plants first. Build the world around them.
Terrariums — Closed vs Open
Probably should have opened with this section, honestly, because terrariums are the type of miniature garden that surprises people the most. They look complicated. They’re not.
A terrarium is simply a glass container — a jar, a geometric frame, a fish tank, a vintage apothecary bottle — used to grow plants in a controlled little environment. The two main types behave very differently, and picking the wrong one for your lifestyle is a real and common mistake.
Closed Terrariums — Self-Watering Ecosystems
A closed terrarium has a lid. Moisture evaporates from the soil, condenses on the glass walls, drips back down into the substrate. It waters itself. If you’re the type of person who forgets plants exist for two weeks at a stretch — no judgment, I am also that person — a closed terrarium is genuinely life-changing.
Best plants for closed terrariums: ferns, mosses, nerve plant (Fittonia), and peperomia. All tropical, all humidity-loving, all perfectly suited to that sealed steamy environment. The IKEA KORKEN jar with lid — about $4 — is an ideal starter vessel. Probably the most beginner-friendly entry point in this entire hobby.
Open Terrariums — For Succulents and Cacti
Open terrariums might be the best option for most beginners, as this style of miniature garden requires almost no hands-on maintenance. That is because succulents, cacti, air plants, and haworthia — all perfect candidates here — actively prefer being ignored. Lower humidity, better airflow, watering every two to three weeks. Geometric open terrariums made of glass and metal frames are everywhere right now, with decent starter options on Amazon in the $15–$25 range.
The substrate layering matters for both types: drainage pebbles at the bottom, a thin layer of activated charcoal, then your growing medium. Skip the charcoal and you’ll eventually have a smell problem. I skipped the charcoal once — in a closed jar I kept on my desk — and discovered the problem about three weeks later. Do not skip the charcoal.
Bonsai and Zen Gardens
These two sit at a higher level of commitment than fairy gardens or terrariums — not impossibly so, but worth knowing before you go buying things.
Bonsai Gardens — Living Sculpture
Bonsai is a Japanese art form — the word translates roughly to “planted in a container” — built around growing a tree in miniature through careful pruning, wiring, and training over years. Sometimes decades. A mature bonsai isn’t just a plant. It’s a living sculpture with real history built into its shape. That’s what makes bonsai endearing to us in a way that’s hard to explain to people who haven’t experienced it.
Frustrated by poorly trained grocery-store bonsai dying within weeks, experienced hobbyists pushed back and started directing beginners toward specialty nurseries instead — places that actually understand the cultivation process and sell trees worth investing in. Beginner-friendly species: juniper, ficus, Chinese elm. A starter juniper from a reputable nursery runs $25–$60. The Bonsai Outlet and Eastern Leaf are both well-regarded online sources.
The skill ceiling is high. The satisfaction ceiling is higher.
Zen Gardens — Miniature Landscapes for the Mind
A traditional zen garden — karesansui — uses raked gravel or sand to represent water, with stones representing mountains or islands. No lush plants, no colorful flowers. The whole point is simplicity and contemplation. Desktop zen gardens run $15–$30 and make surprisingly effective stress-relief tools. The act of raking the sand is genuinely meditative — apparently even people who rolled their eyes at the concept end up doing it for twenty minutes without noticing.
Larger outdoor versions require more planning: choosing the right gravel (decomposed granite or pea gravel both work well), framing the space, selecting meaningful stones. But you can start on a windowsill and scale up whenever you catch the bug.
How to Start Your First Miniature Garden This Weekend
Inspired by the idea of a tiny living world on my apartment windowsill, I built my first open terrarium on a Saturday afternoon — $28 total, about two hours including a trip to IKEA. Here’s exactly how to do it.
What You’ll Need — Under $30
- One geometric open terrarium frame (Amazon — search “geometric terrarium,” pick one with at least 4-inch depth) — $14–$18
- Small bag of succulent and cactus potting mix — $5–$7
- Small bag of pebbles or aquarium gravel for the drainage layer — $3–$4
- One small bag of activated charcoal (pet store aquarium section) — $4–$5
- Two to three small succulents or a single air plant — $2–$4 each at most nurseries or IKEA’s plant section
Step-by-Step Build
- Layer the drainage base. About one inch of pebbles at the bottom. Keeps roots out of standing water.
- Add charcoal. Half an inch of activated charcoal on top of the pebbles. It filters water as it drains through — and it’s the difference between a terrarium that smells like nothing and one that smells like a wet gym bag after three weeks.
- Add potting mix. Two to three inches of succulent mix. Pat it down lightly — firm but not compacted.
- Arrange your plants before planting. Hold them in place, look at it from multiple angles, move things around. The arrangement you picture in your head is almost never the best one. Give it time.
- Plant and settle. Small holes, roots nestled in, soil firmed gently around each plant. No exposed roots.
- Add decorative top dressing. A thin layer of fine gravel or sand over the soil surface looks clean and finished. Optional — but honestly worth the extra five minutes.
- Water lightly. A small mister or a spoon to drizzle water around each plant’s base. Succulents want a drink, not a bath.
Bright indirect light. Water every two to three weeks. That’s genuinely the full maintenance list.
Miniature gardens are one of those hobbies that sounds like a weekend project and quietly becomes a lifelong thing. Start with one small terrarium or a simple fairy garden dish. See what happens. The hobby has a way of growing — even when the plants inside it stay deliberately, beautifully small.


Stay in the loop
Get the latest the gardening nook updates delivered to your inbox.