Why Bean Leaves Turn Yellow in the First Place
Bean leaf yellowing has gotten complicated with all the conflicting advice flying around. Every forum has a different answer. Every gardening blog contradicts the last one. I’ve been growing beans in backyard raised beds for going on nine years now, and I learned everything there is to know about diagnosing yellow leaves the hard way — mostly by killing plants and figuring out why afterward. Today, I will share it all with you.
But what is leaf yellowing, really? In essence, it’s your plant sending a distress signal. But it’s much more than that. It’s a specific signal — one that changes shape and location depending on the exact problem causing it. The cause almost always falls into one of four buckets: nutrient deficiency, water issues, pests, or disease. Each one leaves a different visual fingerprint. Learn to read the fingerprint and you’ve basically solved the mystery before you even touch the plant.
So, without further ado, let’s dive in.
Nitrogen Deficiency Is the Most Common Culprit
Yellowing that starts on the oldest, lowest leaves and slowly climbs the plant? That’s textbook nitrogen deficiency. I learned this three summers ago — planted bush beans in a raised bed I’d run tomatoes and peppers through the previous season. Heavy feeders. Stripped the soil clean. By mid-July my beans looked exhausted, pale, defeated.
Here’s where gardeners get tripped up. Beans fix their own nitrogen — they pull it from the air through a partnership with soil bacteria. Sounds like a self-sufficient system. But that system needs to get started somehow, and poor soil, compacted earth, or a missing bacterial population means it never kicks in properly. The beans starve early before they can help themselves.
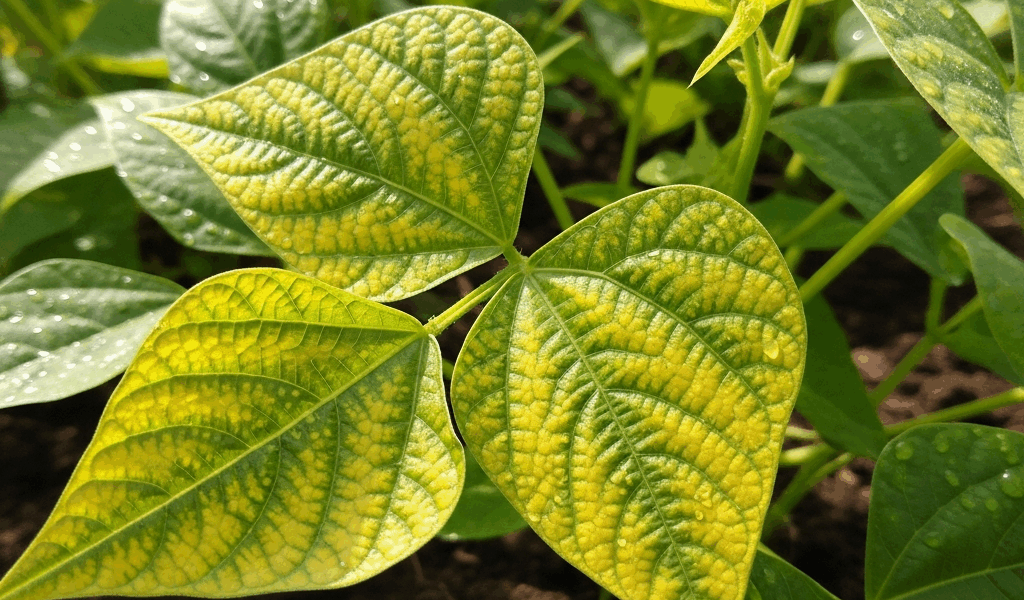
Pattern matters enormously here. Nitrogen deficiency yellows the old leaves first while new growth at the top stays green. That’s nature moving limited nitrogen upward to the growth that needs it most. If you’re seeing yellowing on new leaves instead, or a tip-to-center spread pattern, that’s pointing somewhere else entirely — probably a different nutrient shortage.
The fix isn’t complicated. Side-dress with a 10-10-10 balanced fertilizer, or work a few inches of compost around the base. Fish emulsion every two weeks during the growing season works well too — I use Neptune’s Harvest, roughly $15 for a quart, diluted according to the label. One warning though. Don’t make my mistake from year two of this whole journey — I panicked and dumped a heavy nitrogen fertilizer on a struggling bed. Ended up with massive leafy growth and almost no pod production. Worse, the lush growth attracted aphids within ten days. Measured and consistent beats aggressive every single time.
Overwatering and Underwatering Both Cause Yellowing
Probably should have opened with this section, honestly. Water problems account for more yellowing cases than anything else, and the frustrating part is that both too much and too little produce yellow leaves. Different patterns though. That’s your saving grace.
Overwatering produces pale, uniform yellowing that spreads across the whole plant more or less evenly. No distinct spots, no particular pattern — just a general fading. The soil is the real giveaway. Push your finger two inches down into the bed. Feels like a wrung-out sponge? That’s your answer. Bean roots sitting in waterlogged soil rot fast. Fungi move in within days. The plant is shutting down.
Underwatering looks completely different. Yellowing shows up alongside wilting — leaves curl inward, edges get crispy, and the soil either cracks or pulls away visibly from container walls. Hard, dry earth. That’s it. Simple to distinguish once you’ve seen both.
I’m apparently a chronic overcompensator, and a twice-weekly watering schedule works for me while daily watering never does — even in July heat. Don’t make my mistake. The bigger issue I’ve run into isn’t even watering frequency, it’s drainage. Planted beans in a clay-heavy back bed once, watered the same as always. By week three the plants were struggling badly. Dug down about eight inches and found a dense compacted layer blocking drainage entirely. Water was pooling below the root zone. The fix wasn’t cutting back on water — it was amending the bed with compost and coarse sand to break that layer up. That was 2021. Haven’t had the problem since.
Aim for consistently moist soil that isn’t soggy. Hot dry spells might call for watering every other day. Cooler stretches, twice a week is usually plenty. The finger test is your most reliable tool — if the top inch is dry but two inches down still feels moist, you’re in good shape. If everything feels like mud from surface to depth, hold off another day.
Pests That Turn Bean Leaves Yellow
Pest-caused yellowing has a telling characteristic: the damage concentrates in specific zones rather than spreading evenly, and if you look closely enough — really closely — you’ll usually find the actual culprit right there on the plant.
Spider mites are the main offenders in hot, dry conditions. Nearly invisible on their own, but their damage is unmistakable. Look for fine stippling across the leaf surface — tiny yellow flecks, almost like someone flicked a paintbrush at the leaf from a foot away. Flip the leaf over. Fine webbing, barely visible without squinting, and possibly tiny moving specks the size of a period on a printed page. Spider mites thrive on stressed, underwatered plants specifically. That’s what makes controlling your watering so endearing to us gardeners who’ve battled them — fix the water situation and you’ve already weakened the infestation before spraying anything.
Aphids cluster differently. They prefer tender new growth — soft stems, fresh leaf undersides, growing tips. They’re larger and easier to spot than mites, soft-bodied, usually green or black, always in groups. Yellowing from aphids comes paired with curling leaves because they inject toxins while feeding. A hard spray from the garden hose knocks most colonies off and buys you a few days. For anything that keeps coming back, insecticidal soap handles it cleanly — I use Safer Brand Insect Killing Soap, around $8 a bottle at most garden centers, and it breaks down fast without harming the ladybugs and lacewings that would otherwise help control things naturally.
While you won’t need a magnifying glass for aphids, you will need one — or at least very good close vision — for spider mites. Don’t spray anything until you’ve actually confirmed what you’re dealing with. Flip every suspicious leaf. Get your face close. The difference between a mite stippling pattern and an aphid colony is obvious once you’ve seen both, but you have to actually look.
Bean Mosaic Virus and Fungal Disease
Disease is where things get genuinely frustrating, mostly because the treatment options narrow down fast depending on what you’re looking at.
Bean mosaic virus doesn’t produce uniform yellowing — it creates a mottled, blotchy yellow-green patchwork across leaves that looks almost marbled. Leaves distort. They curl. New growth comes in stunted and misshapen. Frustrated by a mosaic-hit bed several years ago, I made the mistake of trying to treat it with everything I had on the shelf — copper spray, neem oil, the works. None of it touched the problem. Because there’s no treatment for viral disease. Antibiotics don’t affect viruses. Neither do fungicides. You pull the affected plant completely, roots and all, and it goes in the trash — not the compost bin. Viruses survive composting and come back the following season. The only real control is preventing aphids, which are the primary vector spreading mosaic from plant to plant, and sanitizing your hands and pruners before moving between beds.
Fungal problems look completely different and respond — sometimes — to treatment. Bean rust shows up as rust-orange pustules on leaf undersides with yellowish halos visible from the top. Downy mildew produces a white or gray powdery coating underneath leaves with yellowing on the upper surface above it. Copper-based fungicide applied early can slow both — Bonide Copper Fungicide runs under $10 at most garden centers and is one of the more accessible options. That said, fungicides work far better as prevention than as a cure for an established infection.
The best long-term defense against both viral and fungal problems involves three things. Water at the soil line, not overhead — wet foliage overnight is basically an open invitation for fungal spores. Space plants for airflow, not just for yield. And rotate your bean patch to a different bed location every single year — at least one full rotation away. Fungal spores and some viral material overwinters in soil and old plant debris. Moving the crop breaks that cycle before it establishes itself permanently.
Yellow bean leaves feel mysterious until they don’t. Narrow down the pattern first — which leaves yellowed, old ones or new ones, what the soil feels like, whether you can spot anything on the undersides of leaves. Start with nitrogen deficiency and watering problems because those two account for the overwhelming majority of cases. Check for pests second. Only after eliminating the common causes does disease make sense as a conclusion. You’ll solve this.


Stay in the loop
Get the latest the gardening nook updates delivered to your inbox.