Why Your Tomato Seedlings Are Leggy — The Real Cause
Leggy tomato seedlings have gotten complicated with all the conflicting advice flying around. And honestly? Most people are diagnosing the problem wrong before they even get started.
As someone who spent three full seasons blaming overwatering and excessive warmth, I learned everything there is to know about what actually makes seedlings stretch. Turns out I was missing the real culprit entirely. The true cause of leggy tomato seedlings — those thin, pale, elongated stems with barely any foliage — comes down to one thing: insufficient light intensity.
Not duration. Intensity.
That distinction changes everything about how you fix it. Your windowsill gets plenty of hours of sun in March. But the actual intensity coming through that glass? Dramatically weaker than what seedlings need to thrive.
Here’s the math I stumbled onto after borrowing a light meter from a photographer friend: a south-facing window in spring delivers roughly 300–500 foot-candles to seedlings sitting right on the sill. Tomato seedlings need 700–1,000 foot-candles to stay stocky and compact. That gap — that’s why your seedlings look like they’re desperately reaching for something just out of range. They literally are.
The stretching is a survival mechanism. When seedlings don’t get adequate light intensity, they throw their energy into vertical growth, trying to close the distance to the source. Leaf development gets suppressed. Stems go thin because the plant isn’t bothering with structural support — it’s gambling everything on height. Works fine in a forest canopy. Counterproductive in your spare bedroom in March.
Watching that borrowed meter drop as I slid a tray just six inches back from the window was genuinely humbling. The difference between 400 foot-candles and 700 foot-candles sounds abstract until you watch your seedlings respond to it in real time.
Temperature plays a minor role, sure. Consistent warmth above 75°F does encourage some elongation. But I’ve grown leggy seedlings at 65°F under bad light, and compact dark-green ones at 70°F under quality lights. Light intensity dominates — full stop.
Overwatering doesn’t cause legginess either. Don’t make my mistake of chasing that myth for two seasons. Excess moisture creates fungal problems that compound seedling issues, but the watering-leggy connection spread because people who overwater tend to also start seeds in dim basement corners. Correlation, not cause.
The Deep Planting Fix — Tomatoes’ Unique Advantage
But what is deep planting, exactly? In essence, it’s burying a leggy seedling significantly deeper than its original soil line, using the tomato’s unusual ability to generate new roots from buried stem tissue. But it’s much more than just sticking a plant lower in a pot.
Tomatoes will grow adventitious roots all along any stem that gets buried — which makes them almost singular among vegetables in this regard. A leggy pepper is basically a write-off. A leggy tomato still has real potential. That’s what makes this quirk so endearing to us tomato growers.
The process is straightforward, but the details matter.
How to plant leggy tomato seedlings deeper
- Strip the lower leaves from your seedling, leaving 2–3 sets at the top intact. Clean stem, no buried foliage — buried leaves rot and open the door to disease.
- Grab a container that’s actually deeper than what you’re using now. A gallon pot works well. A 4-inch pot means the seedling stays leggy — not enough room to work with.
- Fill it with moist potting mix to about one-third depth.
- Plant the seedling so those remaining leaves sit just above the soil surface. You’re burying roughly 60–70% of the original stem. It’ll look extreme. That’s correct.
- Firm the soil gently around the buried section.
- Water from below — set the pot in a shallow tray of water for 10–15 minutes. Settles the soil without disturbing the stem you just carefully positioned.
Within 7–10 days, you’ll see tiny root primordia forming along the buried stem. By transplant time, you’ll have a root system that looks nothing like what you started with.
Probably should have opened with this detail, honestly: depth percentage really matters. First time I tried this rescue technique, I buried maybe 30% of the stem — thought I was being careful. The plant survived, but the root system was underwhelming. The following year I went to 70% burial, and by late spring those plants were visibly stockier, shrugged off transplant shock, and ran circles around the shallowly-buried ones from the prior season.
One more thing worth repeating — only bury stem. Never leaves. Foliage above the soil line, clean stem below it. Every time.
Deep planting works best when you fix the light situation at the same time. A rescued seedling dropped back under a dim window will just go leggy again. It’s a recovery move, not a cure.
Grow Light Setup That Prevents Leggy Seedlings
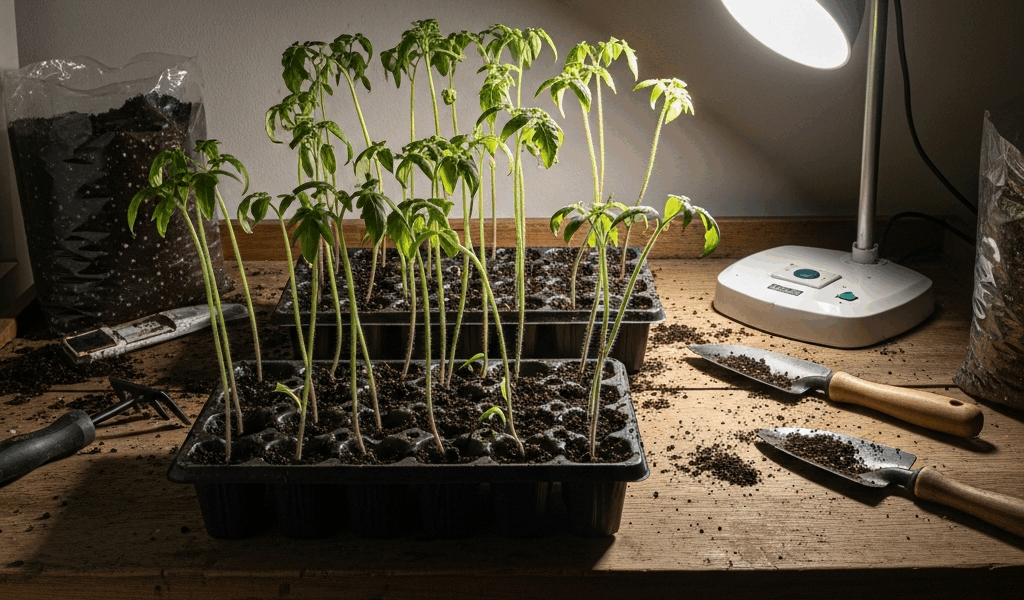
The actual solution is prevention, and that means grow lights. Frustrated by another spring of spindly seedlings despite shuffling trays around the sunniest windows in the house, I finally bought a basic setup using two 4-foot shop lights from Home Depot — $25 each, two T8 LED bulbs per fixture — and set the whole thing on an old metal shelving unit in the basement.
I’d resisted for years. There’s something about a sunny windowsill that feels right — more aligned with actual gardening. But I was running what I now recognize as gardening theater: prioritizing the aesthetic of the setup over whether it actually worked.
Same seeds. Same potting mix. Same watering routine. Different light source. That year’s seedlings were compact, dark green, and sturdy enough to transplant without any special handling.
Grow light height and duration
Position lights 2–3 inches above the seedling canopy at the start. Raise them as the seedlings grow to maintain that gap. Twelve inches up and you’re back to insufficient intensity — might as well use the window. Too close and you’ll scorch the tops. Two to three inches, adjusted regularly, is the target.
Run lights 14–16 hours per day. A basic digital timer — $12 at most hardware stores — handles this automatically. Plugs into the outlet, light plugs into the timer. I run mine 6 a.m. to 8 p.m. and check on the seedlings before work and after dinner. Set it and genuinely forget it.
Budget-friendly grow light options
While you won’t need commercial horticultural lighting, you will need fixtures with enough output to actually reach 700+ foot-candles at seedling level. Those two 4-foot shop lights with T8 LED bulbs — total investment around $60–75 — hit that target and run cool enough that heat stress isn’t a concern.
Full-spectrum LED grow lights might be the best option, as high-efficiency growing requires consistent spectrum quality across the canopy. That is because spectrum gaps can subtly affect leaf development even when intensity looks adequate on a meter. But honestly, the T8 shop lights work fine for a standard seed-starting operation. Aim for bulbs rated 3,000–5,000 lumens per fixture.
The shelving setup doesn’t need to be fancy. Consistent intensity at a stable distance — that’s the only infrastructure requirement that actually matters.
The Fan Trick for Stronger Stems
Here’s something I discovered purely by accident, when a small oscillating fan I’d left running near my seed shelf apparently had been doing something useful the whole time.
Seedlings that grew near that fan had noticeably thicker stems than the ones on the opposite end of the shelf. Apparently when air movement creates gentle turbulence across a seedling, the plant responds by reinforcing its stem in anticipation of resistance. This is a real physiological response — not a gardening myth someone invented on a forum.
A basic 6–8 inch desk fan positioned so it creates subtle movement across the tray is all you need. Run it 2–3 hours a day. You shouldn’t see seedlings actually bowing. If they’re bending dramatically, the fan is too close or too strong — back it off. A gentle rustle of the foliage is what you’re after.
This won’t rescue leggy seedlings on its own. Light first, then fan support, then proper planting depth. In that order.
Prevention for Next Year
Honestly, preventing leggy seedlings is easier than fixing them — once you understand what’s actually driving the problem.
Seed starting timeline
First, you should nail down your timing — at least if you want to avoid the second most common cause of leggy seedlings, which is starting too early. I garden in Zone 5, last frost around May 15th. I start seeds 6–8 weeks out, which puts me in early to mid-March. Not earlier.
Seedlings started in February have nowhere to go. They outgrow their containers weeks before transplant time arrives, get root-bound, get desperate — and get leggy waiting. The temptation is real when January drags on forever. It doesn’t produce better results. It just produces bigger problems.
Check your last frost date, count back 6–8 weeks, start there. That’s it.
Light first, warmth second
A lot of seed-starting guides lead with heat mats and 70–75°F temperatures. Those things matter. But they’re secondary to light — something most guides bury in a footnote, if they mention it at all.
Get your grow light system dialed in before you sow a single seed. It’s genuinely easier to troubleshoot your setup before actively growing seedlings are depending on it. Don’t make my mistake of figuring out the lighting situation in week three when things already look wrong.
Leggy seedlings are fixable through deep planting — tomatoes give you that option when most vegetables don’t. But proper light intensity, appropriate timing, and a fan running a few hours a day will get you transplants that never needed rescuing in the first place. Your spring garden will notice the difference.


Stay in the loop
Get the latest the gardening nook updates delivered to your inbox.