Why Seed Starting Matters in the Pacific Northwest
Starting seeds indoors gives Pacific Northwest gardeners a crucial advantage: the ability to grow heat-loving crops that our short, cool growing season would otherwise make impossible. Tomatoes, peppers, and eggplant need 8-12 weeks of indoor growth before our soil warms enough for transplanting. Without seed starting, we’d be limited to purchasing whatever starts the nursery happens to stock—and hoping they’re suited to our unique climate.
Beyond extending our season, seed starting opens a world of variety. While garden centers might offer a dozen tomato varieties, seed catalogs list hundreds. Growing from seed means growing exactly what you want, from heirloom favorites to modern disease-resistant varieties perfectly suited to our cool nights and wet springs. Many of the best Pacific Northwest performers simply aren’t available as starts.
There’s also the economics. A packet of seeds costs $3-5 and contains dozens of seeds—enough for multiple years of gardening. A single nursery start costs the same amount. For gardeners growing more than a few plants, seed starting pays for itself quickly, even accounting for equipment costs.
Finally, seed starting provides control over growing conditions from the very beginning. You know exactly how plants were raised, what (if any) treatments they received, and can ensure they’re properly hardened off before transplanting. This continuity of care produces healthier, more productive plants.
Understanding Seed Germination
Before diving into techniques, understanding what happens during germination helps troubleshoot problems when they arise. Seeds are dormant embryos surrounded by stored food and protected by a seed coat. Given proper conditions, the embryo awakens and begins growing.
Requirements for Germination
All seeds need three things to germinate: moisture, proper temperature, and oxygen. Some seeds also require light or darkness. Understanding these requirements prevents common problems.
Moisture: Water softens the seed coat and activates enzymes that convert stored starches to sugars the embryo can use. Seeds must absorb significant water—often doubling their weight—before germination begins. However, waterlogged conditions deprive seeds of oxygen and promote rot. The goal is consistent moisture without saturation.
Temperature: Each species has an optimal germination temperature range. Cool-season crops like lettuce and broccoli germinate well at 50-70°F; warm-season crops like tomatoes and peppers prefer 70-85°F. Temperature affects germination speed and percentage—seeds planted in cold soil may germinate slowly or not at all.
Oxygen: Germinating seeds respire rapidly, requiring oxygen from the surrounding environment. This is why seeds rot in waterlogged soil—water displaces air from soil pores. Loose, well-aerated seed starting mix provides the oxygen seeds need.
Light requirements: Most vegetable seeds germinate equally well in light or darkness. Some seeds (lettuce, celery) require light to germinate—cover these with a thin layer of mix and position under lights immediately. A few seeds (pansies, some alliums) germinate better in darkness.
The Germination Process
Once conditions are right, germination proceeds in stages:
- Imbibition: The seed absorbs water, swelling as moisture penetrates the seed coat. This can take hours to days depending on seed size and coat thickness.
- Enzyme activation: Water activates enzymes that begin converting stored starches to sugars the embryo can use for energy.
- Radicle emergence: The embryonic root (radicle) emerges first, anchoring the seedling and beginning to absorb water and nutrients.
- Shoot emergence: The embryonic shoot pushes upward, protected by a curved hook shape in dicots (tomatoes, peppers) or encased in a sheath in monocots (corn, onions).
- Cotyledon expansion: The seed leaves (cotyledons) expand, often pushing the seed coat off as they unfold. These first leaves look different from true leaves and contain stored food that sustains the seedling until true leaves begin photosynthesis.
When to Start Seeds in the Pacific Northwest
Timing seed starting requires counting backward from your target transplant date. For the Seattle area, the last average frost date is April 15th, but soil temperatures remain cool well into May. Heat-loving crops shouldn’t go out until soil reaches 60°F—typically late May in our region. Use these guidelines:
Very Long-Season Crops (12-14 weeks before transplant)
- Onions and Leeks: Start in early January for April transplanting. Onions need 10-12 weeks to develop adequate size for transplanting.
- Artichokes: Start mid-January for reliable first-year production. Artichokes need cold exposure while young to set buds.
- Celery and Celeriac: Start in late January. These slow-growing crops need early starts for fall harvest.
Long-Season Crops (10-12 weeks before transplant)
- Peppers: Start mid-January to early February for late May transplanting. Peppers germinate slowly and grow slowly initially.
- Eggplant: Start late January to mid-February. Similar needs to peppers but slightly faster to develop.
- Rosemary: Start in January. This slow-to-germinate herb needs early starting for usable plants by summer.
Medium-Season Crops (6-8 weeks before transplant)
- Tomatoes: Start early to mid-March for late May transplanting. Starting too early creates leggy, overgrown plants.
- Broccoli, Cabbage, Cauliflower: Start mid-February for April transplanting (spring crop), or late June for fall crops.
- Lettuce: Start in March for May transplanting, then succession sow every 2-3 weeks.
- Basil: Start in late April for late May transplanting. Basil hates cold and shouldn’t go out until nights are reliably above 50°F.
Short-Season Crops (4-6 weeks before transplant)
- Squash and Cucumbers: Start mid to late April for late May transplanting. These fast-growing crops become root-bound quickly.
- Melons: Start late April for early June transplanting. Handle roots carefully—cucurbits resent root disturbance.
- Pumpkins: Start in mid-May for June transplanting.
Direct Sow Outdoors (no indoor starting needed or recommended)
- Peas: February through March. Cold-tolerant and resent transplanting.
- Beans: Late May when soil warms to 60°F. Fast-germinating and root-sensitive.
- Carrots, parsnips: April through June. Long taproots make transplanting impractical.
- Beets, turnips, radishes: March through August. Quick to mature and easy to direct sow.
- Corn: Late May to early June. Needs warm soil and doesn’t transplant well.
- Spinach: February through March, then August through September. Direct sowing is simpler than transplanting.
Essential Seed Starting Equipment
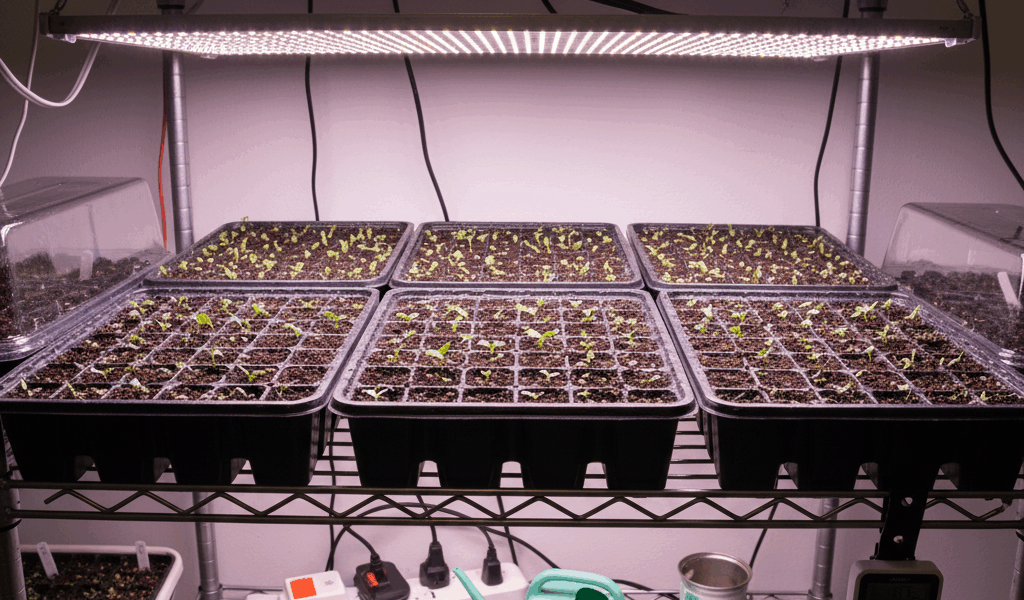
Lighting Systems
Pacific Northwest winters are dark. From January through March, we receive only 8-10 hours of daylight, much of it filtered through clouds. This limited light is insufficient for healthy seedlings. Without supplemental lighting, seedlings become leggy and weak, stretching desperately toward any available light.
LED grow lights have become the standard for home seed starting. They’re energy-efficient, produce minimal heat, last for years, and provide the light spectrum plants need. A 4-foot LED shop light with 6500K bulbs provides adequate light for one standard flat of seedlings. Purpose-built grow lights often include red spectrum LEDs that promote flowering—unnecessary for vegetable starts but not harmful.
Light positioning: Place lights 2-4 inches above seedling tops. Closer light prevents stretching. Adjust height as seedlings grow—most fixtures can be raised using chains or adjustable hangers.
Light duration: Seedlings need 14-16 hours of light daily for stocky, healthy growth. Less light produces leggy plants; more provides no benefit. Use a timer to maintain consistent schedules—seedlings also benefit from a dark period.
Budget options: Standard fluorescent shop lights work but are less efficient than LEDs. They must be positioned very close to seedlings (1-2 inches) to provide adequate intensity. T5 fluorescent fixtures offer improved intensity over T8 or T12 tubes.
Containers and Cell Size
Container choice affects root development, transplanting success, and the amount of potting mix required. Options include:
Standard cell packs: The six-packs and larger flats common at nurseries. Efficient for space and soil usage, but plants become root-bound within 4-6 weeks. Best for quick-growing crops like lettuce and brassicas that transplant young.
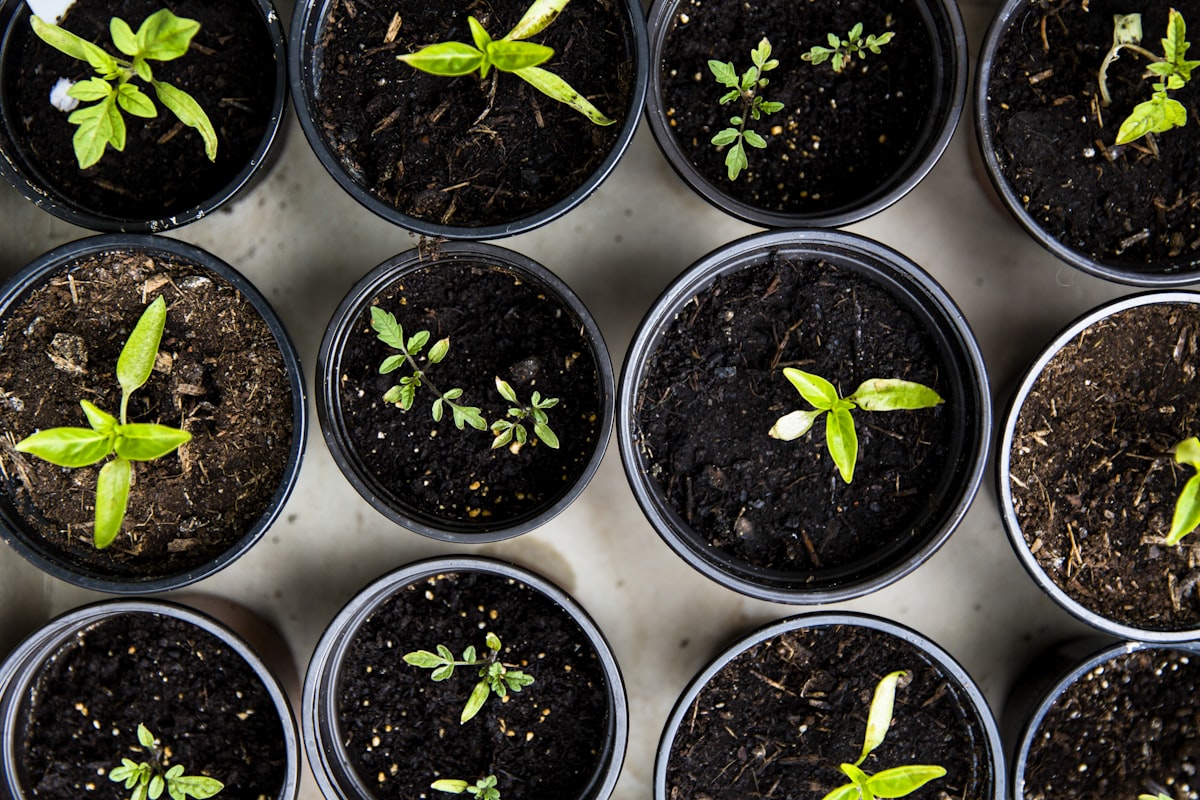
Larger cells or individual pots: 3-4 inch pots provide more root space, allowing longer growth periods before transplanting. Essential for tomatoes, peppers, and other crops started 8-12 weeks early. Requires more soil and space but produces better plants.
Soil blocks: Compressed cubes of potting mix that eliminate containers entirely. Made using a metal blocking tool, soil blocks provide excellent air circulation to roots and eliminate transplant shock—you simply set the block in the garden without disturbing roots. Initial tool investment pays off for serious gardeners.
Peat pots and coir pots: Biodegradable containers that transplant directly into the garden, roots and all. Convenient but can wick moisture away from roots if pot edges become exposed. Tear away the rim and top portion when transplanting.
Cowpots and paper pots: Made from compressed cow manure or paper, these biodegradable options break down quickly in soil. Good environmental choice but decompose rapidly and may need replacing for longer-growing seedlings.
DIY containers: Newspaper pots, yogurt cups, egg cartons, and similar containers work for short-term starting. Ensure adequate drainage holes and expect limited root space. Better than nothing, but purpose-built containers produce better results.
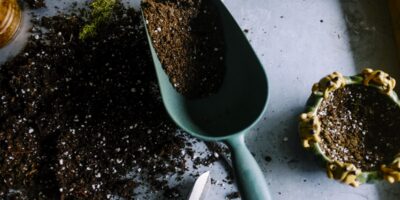
Seed Starting Mix
Never use garden soil for starting seeds. Garden soil compacts in containers, drains poorly, and contains weed seeds, disease organisms, and pests that devastate delicate seedlings. Instead, use a sterile, lightweight seed starting medium.
Commercial seed starting mix offers convenience and consistency. Look for mixes containing peat moss or coir, perlite, and vermiculite. Avoid mixes containing added fertilizer for germination—seeds contain all the nutrition they need initially, and fertilizer salts can damage emerging roots.
DIY seed starting mix:
- 2 parts peat moss or coir (moisture retention)
- 1 part perlite (drainage and aeration)
- 1 part vermiculite (moisture retention and aeration)
Mix thoroughly and moisten before use. The mix should hold together when squeezed but crumble easily—like a wrung-out sponge.
Potting up mix: Once seedlings develop true leaves, they benefit from a richer mix:
- 3 parts commercial potting mix
- 1 part compost
- 1 part perlite
Heat Mats
Soil temperature significantly affects germination speed and success. Most vegetable seeds germinate faster with bottom heat of 70-85°F. In Pacific Northwest homes typically kept at 65-68°F, soil temperatures may stay too cool for optimal germination.
Seedling heat mats provide gentle bottom warmth that speeds germination. They’re particularly valuable for heat-loving crops like peppers, tomatoes, and eggplant. A mat can cut germination time in half and improve germination percentage.
Using heat mats effectively:
- Place the mat under your tray before planting
- Use a thermostat controller to maintain consistent temperature (75-80°F is ideal for most vegetables)
- Remove seeds from heat once they germinate—seedlings grow better at cooler temperatures
- Without a thermostat, monitor soil temperature to prevent overheating
Trays, Domes, and Watering Systems
Solid bottom trays catch water runoff and allow bottom watering. Standard 10×20 inch flats hold most standard cell packs and are reusable for years.
Humidity domes maintain moisture during germination. Seeds need consistent moisture to germinate, and domes reduce the need for frequent watering. However, remove domes immediately after seeds sprout—the high humidity promotes damping off disease.
Bottom watering encourages strong root growth by drawing roots downward toward moisture. Fill the tray with 1/2 inch of water and allow cells to absorb what they need over 15-20 minutes, then drain excess. This method also keeps foliage dry, reducing disease.
The Complete Seed Starting Process
Step 1: Prepare Your Workspace
Gather all materials before starting: containers, seed starting mix, labels, marker, seeds, spray bottle, trays, and domes. A clean, well-lit work surface makes the process easier. Having everything ready prevents interruptions that could dry out seeds or mix.
Step 2: Prepare the Growing Medium
Pour seed starting mix into a large container (a clean bucket or basin works well). Add warm water gradually, mixing as you go, until the medium is evenly moist but not saturated. The mix should hold together when squeezed but not drip water. Dry mix repels water initially—pre-moistening ensures even moisture throughout.
Step 3: Fill Containers
Fill containers with moistened mix, pressing gently to eliminate air pockets but not compacting. Leave 1/4 to 1/2 inch of space at the top for watering. Overfilled containers make watering difficult and promote splash-borne diseases.
Step 4: Plant Seeds
Proper planting depth affects germination success. The general rule: plant seeds at a depth of 2-3 times their diameter. Tiny seeds like lettuce barely get covered; large seeds like beans go 1-2 inches deep.
For small cells, plant 2-3 seeds per cell, then thin to the strongest seedling after emergence. For larger containers or soil blocks, plant 1-2 seeds. Use your finger or a pencil to make indentations, place seeds, and cover with mix.
Seed spacing by type:
- Tiny seeds (lettuce, celery, petunias): Surface sow and press gently into mix, or cover with 1/8 inch of mix or vermiculite
- Small seeds (tomatoes, peppers, brassicas): Plant 1/4 inch deep
- Medium seeds (cucumbers, squash): Plant 1/2 to 1 inch deep
- Large seeds (beans, corn, peas): Plant 1-2 inches deep
Step 5: Label Everything
Always label containers immediately after planting. Include variety name and planting date at minimum. Even if you’re sure you’ll remember, seedlings look remarkably similar in their early stages. Use waterproof markers or pencil—regular markers fade under moisture and light.
Step 6: Provide Moisture and Warmth
Mist the surface lightly with a spray bottle, place humidity domes over trays, and position on heat mats if available. Check moisture daily—the mix should stay consistently moist but never soggy. Seeds can dry out and die within hours if moisture evaporates.
Keep trays in a warm location. Optimal germination temperatures vary by crop:
- Cool-season crops (lettuce, broccoli, peas): 50-70°F
- Warm-season crops (tomatoes, cucumbers): 70-80°F
- Heat-loving crops (peppers, eggplant, melons): 75-85°F
Step 7: Post-Germination Care
Once seeds sprout (visible as soon as the soil surface cracks), care changes dramatically:
- Remove humidity domes immediately: Continued high humidity promotes damping off disease
- Move to lights: Seedlings need light immediately upon emergence
- Reduce temperature: Most seedlings grow best at 60-70°F after germination—cooler than optimal germination temperature
- Maintain air circulation: A small fan on low speed strengthens stems and prevents disease
Growing Strong Seedlings
Light Management
Inadequate light is the primary cause of weak, leggy seedlings. Even seemingly bright windowsills provide far less light than seedlings need, especially during Pacific Northwest winters. Position lights 2-4 inches above seedling tops and adjust as plants grow.
Signs of insufficient light:
- Elongated stems stretching toward light source
- Pale or yellowish foliage
- Stems thin and weak
- Leaves small relative to stem length
Corrective measures:
- Lower lights to 2 inches above plants
- Increase light duration (up to 16 hours)
- Add additional light fixtures
- Use reflective material around growing area to maximize light
Watering Techniques
Proper watering prevents both drought stress and the root rot that kills many seedlings. Check moisture daily by feeling the weight of containers or pressing a finger into the soil surface.
Bottom watering is ideal for established seedlings. Fill the tray with 1/2 inch of water and allow cells to wick up moisture over 15-20 minutes. Drain any water that remains after 20 minutes. This method:
- Encourages deep root growth
- Keeps foliage dry, reducing disease
- Provides even moisture throughout the root zone
Top watering works for freshly planted seeds and very small seedlings. Use a gentle spray or watering can with a fine rose to avoid disturbing seeds or damaging delicate stems. Water until it drains from container bottoms.
Signs of overwatering:
- Persistently wet soil surface
- Algae growth on soil surface
- Yellowing lower leaves
- Damping off (sudden seedling collapse)
Signs of underwatering:
- Wilting that doesn’t recover by morning
- Dry, crumbly soil surface
- Leaf edges turning crispy
- Stunted growth
Temperature Management
After germination, most seedlings grow best at moderate temperatures—generally 60-70°F during the day, slightly cooler at night. These temperatures promote stocky, compact growth. Warmer conditions produce faster but weaker growth.
In Pacific Northwest homes, achieving these temperatures is usually easy—we often struggle more with providing enough warmth for germination than cooling things down afterward. Position seedlings away from heat vents and direct sunlight through windows, which can overheat delicate plants.
Fertilizing Seedlings
Seeds contain enough stored nutrition to sustain seedlings through their first few weeks. Once the first true leaves develop (the second set of leaves, which look like the plant’s mature foliage), begin light fertilization.
Fertilizer options:
- Dilute liquid fertilizer: Use 1/4 to 1/2 strength water-soluble fertilizer weekly. Fish emulsion, liquid kelp, and balanced organic fertilizers all work well.
- Compost tea: Steep finished compost in water for 24-48 hours, strain, and use for watering. Provides gentle nutrition and beneficial microorganisms.
- Slow-release granular: Mix into potting-up soil for sustained feeding through transplant time.
Signs of nutrient deficiency:
- Pale or yellowing leaves (nitrogen)
- Purple tinting on stems and leaf undersides (phosphorus)
- Brown leaf edges (potassium)
- Overall stunted growth
Potting Up
Fast-growing seedlings outgrow small containers before transplant time. Potting up into larger containers provides room for continued root development and prevents the stunting that occurs when roots circle inside cramped cells.
When to pot up:
- When roots emerge from container drainage holes
- When the plant seems disproportionately large for its container
- When watering needs become excessive (small soil volume dries quickly)
- Before seedlings become root-bound (a tangle of circling roots)
Potting up process:
- Water seedlings well an hour before potting up
- Fill new containers with moistened potting mix, leaving a depression for the root ball
- Carefully remove seedling from original container, supporting by leaves (not stem)
- Place in new container and fill around roots with potting mix
- Firm gently and water to settle soil
- Keep out of direct sun for a day or two while roots recover
Potting up tomatoes: Tomatoes can be buried deeply when potted up—the buried stem will develop additional roots, creating a stronger plant. Bury tomato stems up to the lowest leaves when transplanting.
Hardening Off: The Critical Transition
Seedlings grown indoors live a pampered life: constant temperatures, no wind, filtered light. The outdoor world presents an assault of bright sun, drying winds, temperature swings, and temperature extremes. Without gradual acclimatization—called hardening off—transplants suffer severe stress that stunts growth or kills them outright.
The Hardening Off Process
Begin hardening off 1-2 weeks before your planned transplant date. The goal is gradually exposing plants to outdoor conditions while they’re still safely portable.
Day 1-2: Place seedlings outdoors in a sheltered, shaded location for 2-3 hours during the warmest part of the day. A covered porch or north-facing area works well. Bring them inside overnight.
Day 3-4: Increase outdoor time to 4-5 hours. Begin introducing filtered sunlight—morning sun through trees or reflected light. Continue bringing indoors at night.
Day 5-7: Expose to 6-8 hours outdoors, including some direct morning sun. Move to a less sheltered location. Leave out overnight if temperatures stay above 50°F (45°F for cool-season crops).
Day 8-10: Full sun exposure for extended periods. Leave out overnight unless frost threatens. By now, plants should handle full outdoor conditions.
Day 11-14: Plants remain outdoors full-time. They’re ready to transplant.
Hardening Off Tips
- Watch the weather: Don’t begin hardening off during cold snaps, heat waves, or unusually windy periods
- Avoid afternoon sun initially: Morning sun is gentler than intense afternoon sun
- Keep plants watered: Wind and sun dry containers quickly; check moisture twice daily
- Don’t rush: Extending the hardening off period never hurts; shortening it often does
- Use a cold frame: Cold frames provide a controlled transition space, allowing you to adjust venting as weather changes
Transplanting Success
Timing the Transplant
Even hardened-off plants have preferences about transplanting conditions. Choose your moment for best results:
- Transplant on cloudy days or in late afternoon: Reduced sun stress helps plants recover
- Wait for appropriate soil temperature: Warm-season crops need soil above 60°F; cool-season crops tolerate cooler soil
- Avoid windy days: Wind dries plants rapidly and increases stress
- Water beds deeply before planting: Moist soil receives transplants better than dry
Transplanting Technique
- Water seedlings well several hours before transplanting
- Dig holes slightly larger than root balls
- Remove seedlings carefully, supporting by root ball or leaves (never pull by stem)
- Set at appropriate depth: Most vegetables go at the same depth they grew in containers; tomatoes can be buried deeper
- Fill around roots, firming gently to eliminate air pockets
- Water deeply immediately after planting
- Apply mulch around (not against) stems
- Provide temporary shade for the first few days if weather turns hot and sunny
Post-Transplant Care
The first week after transplanting is critical. Keep soil consistently moist—not soggy, but never dry. Protect from extreme weather with row covers, shade cloth, or cloches if needed. Don’t fertilize immediately; let roots establish for a week or two before feeding.
Watch for signs of transplant shock: wilting, yellowing leaves, or stunted growth. Most plants recover within a week if properly cared for. Persistent problems may indicate root damage, disease, or environmental stress requiring intervention.
Troubleshooting Common Problems
Poor Germination
Symptoms: Seeds fail to sprout, or only a few emerge
Causes and solutions:
- Old seeds: Seed viability decreases with age. Buy fresh seeds or test germination rate before planting
- Improper temperature: Use heat mats for warmth-loving seeds; don’t overheat cool-season crops
- Too deep planting: Plant at appropriate depth—2-3 times seed diameter maximum
- Inconsistent moisture: Seeds that dry out during germination often fail; maintain even moisture
- Poor seed contact: Firm soil gently after planting to ensure good seed-soil contact
Damping Off
Symptoms: Seedlings suddenly collapse, often with a pinched appearance at soil level
Causes: Fungal pathogens thrive in cool, wet, poorly ventilated conditions
Prevention:
- Use sterile seed starting mix
- Provide good air circulation (a small fan helps)
- Remove humidity domes immediately after germination
- Water from below rather than overhead
- Avoid overwatering
- Keep seedlings under adequate light
Treatment: Once damping off strikes, affected seedlings cannot be saved. Remove affected plants immediately to prevent spread. Improve conditions for remaining seedlings.
Leggy Seedlings
Symptoms: Tall, thin stems; pale foliage; plants stretching toward light
Causes: Insufficient light intensity or duration
Solutions:
- Lower lights to 2-4 inches above seedlings
- Increase light duration to 14-16 hours
- Add additional light fixtures
- Reduce temperatures slightly (warmer conditions accelerate legginess)
Remediation: Tomatoes can be buried deeper when potting up; other seedlings may need staking until they strengthen.
Yellow Leaves
Symptoms: Foliage turns pale or yellow, starting with oldest leaves
Causes:
- Nitrogen deficiency: Most common cause; begin fertilizing with nitrogen-rich fertilizer
- Overwatering: Root damage limits nutrient uptake; allow soil to dry slightly between waterings
- Cold stress: Low temperatures slow nutrient uptake; increase temperature or move to warmer location
- Natural aging: Cotyledons yellow and drop as true leaves take over; this is normal
Purple Stems and Leaves
Symptoms: Reddish-purple coloring on stems and leaf undersides
Causes:
- Phosphorus deficiency: Cold soil or root damage limits phosphorus uptake
- Temperature stress: Cold temperatures cause purple pigmentation in some plants
Solutions: Warm soil temperature, ensure roots are healthy, provide phosphorus-containing fertilizer if deficiency persists after warming.
Saving Seeds for Future Seasons
Once you master seed starting, consider saving seeds from your best performers. Seed saving closes the loop, making gardening more self-sufficient and allowing you to develop varieties adapted to your specific conditions.
Best Crops for Beginning Seed Savers
- Tomatoes: Self-pollinating, easy to save, true to type
- Beans and peas: Self-pollinating, simply dry and store pods
- Lettuce: Self-pollinating, though allow bolted plants to mature seeds
- Peppers: Mostly self-pollinating; keep hot and sweet varieties separate
Crops to Avoid Initially
- Squash and cucumbers: Cross-pollinate readily, requiring isolation
- Brassicas: Biennial, requiring two seasons; cross-pollinate extensively
- Carrots and onions: Biennial and cross-pollinate
- Corn: Cross-pollinates by wind over long distances
Seed Storage
Properly stored seeds remain viable for years. Store in cool, dark, dry conditions:
- Paper envelopes inside sealed jars with desiccant
- Refrigerator storage extends viability
- Label with variety and date saved
- Test germination before planting if stored more than 2-3 years
Seed Starting Calendar for Pacific Northwest Gardeners
Use this month-by-month guide for the Seattle area. Adjust timing for other locations based on your last frost date.
January
- Start onions and leeks (week 1-2)
- Start artichokes (week 2-3)
- Start peppers (week 3-4)
- Order remaining seeds
February
- Continue starting peppers (week 1)
- Start eggplant (week 1-2)
- Start celery (week 1-2)
- Start early brassicas for spring planting (week 2-3)
- Start slow-growing herbs like rosemary (week 1-2)
March
- Start tomatoes (week 1-2)
- Start additional brassicas (week 1-2)
- Start lettuce and greens (week 2-4)
- Start parsley and slow herbs (week 2-3)
April
- Continue starting lettuce (week 1-2)
- Start basil (week 3-4)
- Start squash and cucumbers (week 3-4)
- Begin hardening off early starts
May
- Start melons (week 1)
- Start pumpkins (week 2)
- Transplant tomatoes and peppers after soil warms (week 3-4)
- Direct sow warm-season crops outdoors
June
- Start fall brassicas (week 4)
- Continue succession planting lettuce
July
- Continue starting fall brassicas (week 1-2)
- Start fall lettuce in shade (week 2-3)
August
- Start overwintering lettuce varieties (week 2-3)
- Start overwintering onion sets (week 3-4)
Seed starting transforms gardening possibilities. With a few lights, some trays, and attention to detail, you can grow any vegetable suited to our climate—not just what the local nursery stocks. The skills you develop serve for a lifetime of gardening success.


Stay in the loop
Get the latest the gardening nook updates delivered to your inbox.